
Front Calliper Overhaul
Page 1 of 1

Front Calliper Overhaul
![]() The Bishop Wed Jan 25, 2012 5:04 am
The Bishop Wed Jan 25, 2012 5:04 am
Calliper Overhaul:
Ford Escort XR3i Mk5 Cabby
This “HOW 2 Guide” covers the steps we used to overhaul the front Brake Callipers and Hubs on “Project Bender”. A lot of these initial guides will be from work on this project, simply because we are doing it now. You can always use this as good starting point for any project car, but the specifics are for the Mk5 Escort range.
Tools:
Ratchet
Ratchet Extension Bar
Sockets (10mm – 19mm)
Open ended spanners (8mm – 19mm)
Pry Bar (or large Flat Headed Screwdriver)
Rubber Mallet
Car Jack & Axle Stands
Allen Keys
Freezer Bags
New Pads
New Discs
Brake Fluid (Dot 3)
Catch Tank, Bucket to catch Fluid
Wire Brush
Patience

This is what I would consider to be a Very Basic tool kit. Everyone should have the minimum of the pictured (DAN!!!!!). You will not use all of these on this job but it is a good idea to have this as a minimum. I will do another guide on Tools later. The only thing I have left out is a Wheel brace. Obviously you will need to remove the wheels, but you should have the relevant tools in the cars tool kit. If not SORT IT OUT!!!!!
Removal:
Find steady ground (not on a hill or grass) put the hand brake on (Chock rear wheels if you want). Loosen all of the wheel nuts by half a turn, jack up the front end of the car (on the jacking point, check hand book) and rest the side you are working on with a suitable Axle Stand (2 tonne is plenty), Now you can remove the wheel nuts and remove the wheel . You should see something like this (pic)

Now, you are going to get dirty, if you got surgeons gloves where them or invest in a decent set of mechanics pit gloves My Snap-on ones cost me £35 but have lasted years. (pic)

This part is much easier if you leave the steering lock on or can lock the steering rack.
Grab your 17mm Socket and Ratchet (or solid Bar if available) on the rear of the calliper there are 2 17mm bolts, that hold the calliper to the hub. These will inevitably be very, VERY tight. Make sure you have enough room and the car is secure. Put the socket on one of the bolt heads and hold tight, take your Rubber Mallet and, gently at first, hit the ratchet handle to loosen the bolt. If there is no joy, try to tighten it first to crack the tread lock and then loosen. Once loose, just use the ratchet as normal to remove the bolt, and then repeat on the other Bolt head.
Before you remove the calliper you need to disconnect the brake line. Use a 10mm socket to loosen the bolt and remove the brake line. I used a cable tie to secure it to the suspension spring; this stops fluid leaking everywhere and keeps it out of the way. It is a good idea to put some old newspaper down and use a catch tank or bowl to catch the leaking fluid.
Next bit gets messy. Use the rubber mallet to gently ease the calliper off the brake disc. This will cause fluid to spurt out of the calliper because you are compressing the piston, so if you want put some glasses on, but it will probably just cover your Arch liner in fluid (Newspaper was a good idea now). Slide the Calliper off and put to one side for the minute.
Now you can remove the Brake disc from the Hub, it should just slide of the studs (be careful not to strip their threads). Also grab your 13mm socket and remove the nut (halfway up suspension strut) that ties the brake line to the suspension (this will give you better access later).
Now grab your freezer bags (large one) put the calliper, 2 large bolts and nut in the bag, write on it which side of the car they are from and stick it out off the way somewhere safe, with the disc.

You should now see this (pic)
Congratulations you have now striped one side, and are ready to repeat on the other side. Do it again and then come back, we will then move on to the next stage.
OVERHAUL.
Callipers:
Ok so now you should have removed both callipers and discs from the front end of the car. Next is to strip the Callipers and start the overhaul.(pic)

On the side of the Calliper you will find 2 long plastic tubes, these should have plastic dome caps in the ends of them, take a flat head screwdriver and pry the caps off. Underneath you should find 2 Allen Key bolts. Grab a 7mm Allen Key and remove the 2 Bolts (you will need to try and pull them out as the wont simply fall out). Once they are removed you can remove the adjustable arm from the calliper (pic)

Use the Flat head Screwdriver to remove the retaining clip from adjustable arm and the Brake pads should slip out easily. (pic)

Put the old Pads, Retaining Clip and Allen Bolts in the bag with the other nuts and bolts, Put them somewhere safe until later. Do the same for the other calliper.
With both of the callipers and arms striped, start to overhaul, grab your Wire Brush and start to clean. You can use some liquid help in the form of “Brake & Clutch Cleaner” or even meth’s but be careful not to get any on the rubber seals.
Once they are clean, give them a clean. You need to make sure that all of the loose rust, brake dust and Grease are removed from the bodies. Again use your cleaner or meth’s to de grease.
We wanted to protect the Callipers from rust and make them look a bit nicer; we got a small can of Black hammerite and brushed it on. This stuff will take around 12 hrs to dry properly (depending on how F*#@ing freezing your unit is). (pic)
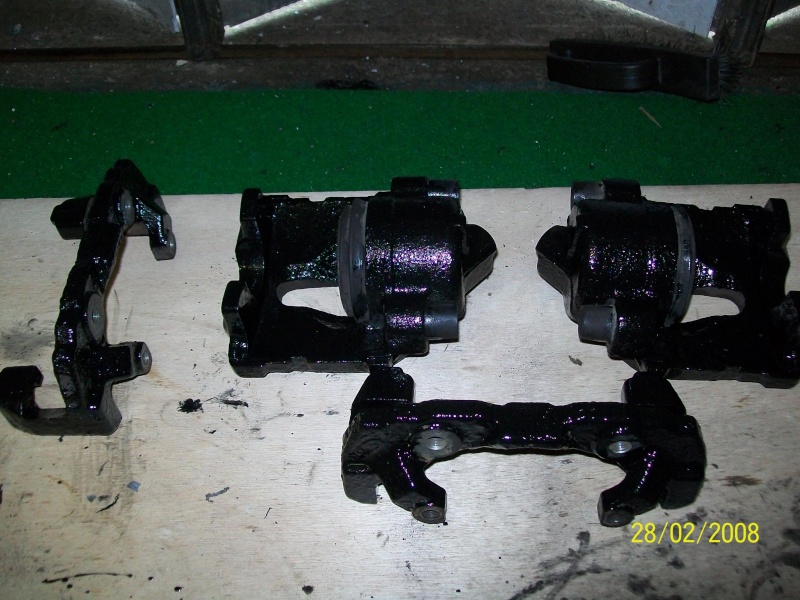
Once the Black had dried, we put the top coat of Silver Smooth Hammerite on; again give 12 hrs to dry properly before you get finger prints on them. (pic)

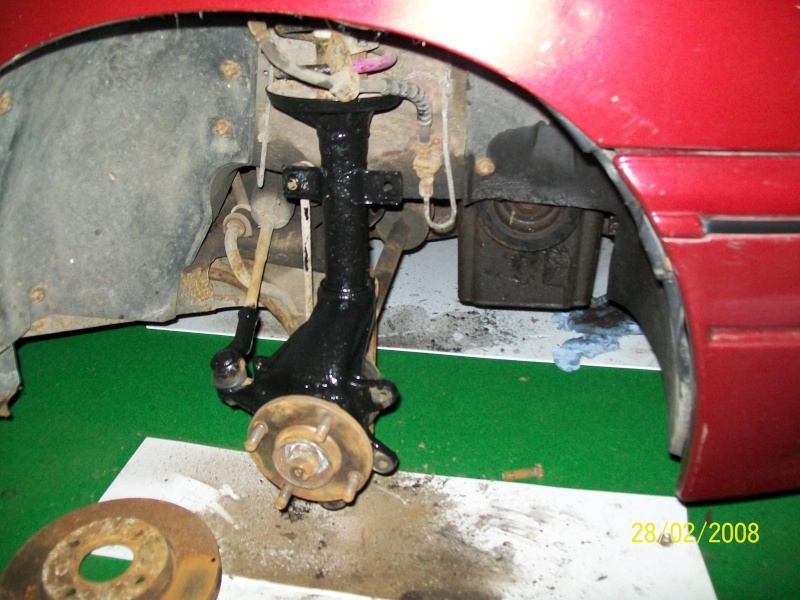
While the Callipers are drying, make a Start on the Hubs. You can remove them but we left them on. There is a Pinch bolt at the rear (to get Strut off) and a Ball Joint on the bottom.
Again Wire Brush, Clean and Paint. (pic)
[url=https://servimg.com/view/17213902/40]
(Although the old disc is on, these will be replaced, this is just for illustration purposes).
Refitting:
To refit the callipers, simply do the reverse of removal. Grab the NEW DISC and slide it onto the hub over the studs. This will remain loose until the Calliper is fitted.
Grab your NEW PADS, there are 2 distinct Pads. One will have fingers on the back in a circular shape; this pad goes onto the calliper piston. The clip should slide into the piston recess, the other pad fits into the adjustable arm side; use the Retaining clip on the outside of the arm.
Next marry up the hole on the adjustable arm to the holes on the main calliper body, refit the Allen bolts using your 7mm Allen key. Replace the plastic dust caps and the calliper is rebuilt. (pic)

Hold the Calliper up to the disc and hub. You may need to push the piston back into the housing for clearance, use your pry bar and gently push it in; this will cause fluid to spurt out. Replace the 2 large 17mm bolts to the back of the calliper and tighten as much as you can. Next refit the 10mm Bolt through the Brake line and onto the calliper body, also refit the 13mm nut to the strut mounting point. That’s the calliper refitted, do the same to the other side.
Bleeding:
Grab your Dot 3 Brake fluid. Top up the reservoir in the engine bay up to Max. Next loosen off the bleeding nipple on the calliper body (bolt with a hole in the top). If you have a Bleeding kit, use it, if not put a catch tank under the calliper. Get a friend to pump the brake pedal until the fluid flows evenly, retighten and go to other side and repeat. Continue this along with topping up the reservoir until the brakes are not spongy and all of the air is out of the lines.
Wheel:
Refit the wheels. I would say follow my wheel fitting “HOW 2” but I haven’t written it yet, but if I have by the time you read this then do that.
Drop the car to the ground and take it for a test drive to check the breaks don’t need bleeding again.
Congratulations you have now overhauled your Front Callipers, Discs and hubs on you project.
Thanks for reading
The Bishop
Ford Escort XR3i Mk5 Cabby
This “HOW 2 Guide” covers the steps we used to overhaul the front Brake Callipers and Hubs on “Project Bender”. A lot of these initial guides will be from work on this project, simply because we are doing it now. You can always use this as good starting point for any project car, but the specifics are for the Mk5 Escort range.
Tools:
Ratchet
Ratchet Extension Bar
Sockets (10mm – 19mm)
Open ended spanners (8mm – 19mm)
Pry Bar (or large Flat Headed Screwdriver)
Rubber Mallet
Car Jack & Axle Stands
Allen Keys
Freezer Bags
New Pads
New Discs
Brake Fluid (Dot 3)
Catch Tank, Bucket to catch Fluid
Wire Brush
Patience
This is what I would consider to be a Very Basic tool kit. Everyone should have the minimum of the pictured (DAN!!!!!). You will not use all of these on this job but it is a good idea to have this as a minimum. I will do another guide on Tools later. The only thing I have left out is a Wheel brace. Obviously you will need to remove the wheels, but you should have the relevant tools in the cars tool kit. If not SORT IT OUT!!!!!
Removal:
Find steady ground (not on a hill or grass) put the hand brake on (Chock rear wheels if you want). Loosen all of the wheel nuts by half a turn, jack up the front end of the car (on the jacking point, check hand book) and rest the side you are working on with a suitable Axle Stand (2 tonne is plenty), Now you can remove the wheel nuts and remove the wheel . You should see something like this (pic)
Now, you are going to get dirty, if you got surgeons gloves where them or invest in a decent set of mechanics pit gloves My Snap-on ones cost me £35 but have lasted years. (pic)
This part is much easier if you leave the steering lock on or can lock the steering rack.
Grab your 17mm Socket and Ratchet (or solid Bar if available) on the rear of the calliper there are 2 17mm bolts, that hold the calliper to the hub. These will inevitably be very, VERY tight. Make sure you have enough room and the car is secure. Put the socket on one of the bolt heads and hold tight, take your Rubber Mallet and, gently at first, hit the ratchet handle to loosen the bolt. If there is no joy, try to tighten it first to crack the tread lock and then loosen. Once loose, just use the ratchet as normal to remove the bolt, and then repeat on the other Bolt head.
Before you remove the calliper you need to disconnect the brake line. Use a 10mm socket to loosen the bolt and remove the brake line. I used a cable tie to secure it to the suspension spring; this stops fluid leaking everywhere and keeps it out of the way. It is a good idea to put some old newspaper down and use a catch tank or bowl to catch the leaking fluid.
Next bit gets messy. Use the rubber mallet to gently ease the calliper off the brake disc. This will cause fluid to spurt out of the calliper because you are compressing the piston, so if you want put some glasses on, but it will probably just cover your Arch liner in fluid (Newspaper was a good idea now). Slide the Calliper off and put to one side for the minute.
Now you can remove the Brake disc from the Hub, it should just slide of the studs (be careful not to strip their threads). Also grab your 13mm socket and remove the nut (halfway up suspension strut) that ties the brake line to the suspension (this will give you better access later).
Now grab your freezer bags (large one) put the calliper, 2 large bolts and nut in the bag, write on it which side of the car they are from and stick it out off the way somewhere safe, with the disc.
You should now see this (pic)
Congratulations you have now striped one side, and are ready to repeat on the other side. Do it again and then come back, we will then move on to the next stage.
OVERHAUL.
Callipers:
Ok so now you should have removed both callipers and discs from the front end of the car. Next is to strip the Callipers and start the overhaul.(pic)
On the side of the Calliper you will find 2 long plastic tubes, these should have plastic dome caps in the ends of them, take a flat head screwdriver and pry the caps off. Underneath you should find 2 Allen Key bolts. Grab a 7mm Allen Key and remove the 2 Bolts (you will need to try and pull them out as the wont simply fall out). Once they are removed you can remove the adjustable arm from the calliper (pic)
Use the Flat head Screwdriver to remove the retaining clip from adjustable arm and the Brake pads should slip out easily. (pic)
Put the old Pads, Retaining Clip and Allen Bolts in the bag with the other nuts and bolts, Put them somewhere safe until later. Do the same for the other calliper.
With both of the callipers and arms striped, start to overhaul, grab your Wire Brush and start to clean. You can use some liquid help in the form of “Brake & Clutch Cleaner” or even meth’s but be careful not to get any on the rubber seals.
Once they are clean, give them a clean. You need to make sure that all of the loose rust, brake dust and Grease are removed from the bodies. Again use your cleaner or meth’s to de grease.
We wanted to protect the Callipers from rust and make them look a bit nicer; we got a small can of Black hammerite and brushed it on. This stuff will take around 12 hrs to dry properly (depending on how F*#@ing freezing your unit is). (pic)
Once the Black had dried, we put the top coat of Silver Smooth Hammerite on; again give 12 hrs to dry properly before you get finger prints on them. (pic)
While the Callipers are drying, make a Start on the Hubs. You can remove them but we left them on. There is a Pinch bolt at the rear (to get Strut off) and a Ball Joint on the bottom.
Again Wire Brush, Clean and Paint. (pic)
[url=https://servimg.com/view/17213902/40]
(Although the old disc is on, these will be replaced, this is just for illustration purposes).
Refitting:
To refit the callipers, simply do the reverse of removal. Grab the NEW DISC and slide it onto the hub over the studs. This will remain loose until the Calliper is fitted.
Grab your NEW PADS, there are 2 distinct Pads. One will have fingers on the back in a circular shape; this pad goes onto the calliper piston. The clip should slide into the piston recess, the other pad fits into the adjustable arm side; use the Retaining clip on the outside of the arm.
Next marry up the hole on the adjustable arm to the holes on the main calliper body, refit the Allen bolts using your 7mm Allen key. Replace the plastic dust caps and the calliper is rebuilt. (pic)
Hold the Calliper up to the disc and hub. You may need to push the piston back into the housing for clearance, use your pry bar and gently push it in; this will cause fluid to spurt out. Replace the 2 large 17mm bolts to the back of the calliper and tighten as much as you can. Next refit the 10mm Bolt through the Brake line and onto the calliper body, also refit the 13mm nut to the strut mounting point. That’s the calliper refitted, do the same to the other side.
Bleeding:
Grab your Dot 3 Brake fluid. Top up the reservoir in the engine bay up to Max. Next loosen off the bleeding nipple on the calliper body (bolt with a hole in the top). If you have a Bleeding kit, use it, if not put a catch tank under the calliper. Get a friend to pump the brake pedal until the fluid flows evenly, retighten and go to other side and repeat. Continue this along with topping up the reservoir until the brakes are not spongy and all of the air is out of the lines.
Wheel:
Refit the wheels. I would say follow my wheel fitting “HOW 2” but I haven’t written it yet, but if I have by the time you read this then do that.
Drop the car to the ground and take it for a test drive to check the breaks don’t need bleeding again.
Congratulations you have now overhauled your Front Callipers, Discs and hubs on you project.
Thanks for reading
The Bishop

The Bishop- The Boss

- Posts : 71
Join date : 2012-01-24
Age : 48
Location : Barry-Bay-Dos -

Page 1 of 1
Permissions in this forum:
You cannot reply to topics in this forum|
|
|